Translate

Thursday, June 2, 2016

Homestead First aid : DIY Antiseptic ointment (Petroleum free and natural)

Hello Lovelies, Taz here! I know its been awhile since I have posted, lots has been going on, our entire household has had a horrible stomach virus and its been kicking our butts, but I have still been working on getting ready to go on a vacation! YAY.  I might make a post about what I am packing for emergency supplies on that trip.. and we are going camping so.. some of it is for that.. But now for what this post is about.. ANTISEPTIC OINTMENT!


I will have a Homestead First Aid DIY section, and I will be posting alternatives to store brand stuff that is usually Petroleum based.. I HATE PETROLEUM JELLY! IT IS HORRIBLE HORRIBLE HORRIBLE For your skin! It is Horrible for YOU. Would you put gasoline on your lips? no? then don't put petroleum Jelly on your lips.. or anywhere else.. I will post a Petroleum free salve type skin thing soon.. but this one is for well you saw.


EQUIPMENT YOU WILL NEED :

A Container to put your oils and wax into, I used a Mason jar, a measuring cup will work, anything that will hold the oils and is microwave safe, or oven safe..


A Scale that you can tare or Null out. . I have one I got at walmart years ago for 10 dollars, I think everyone should keep a scale on hand for MANY reasons.


A Microwave, or stove top I used the Microwave for convenience.

Containers to put your ointment in!  I used little ones I got 10 for a dollar because saving money is good.


Paper Towels or a rag because this gets messy 


and something to stir with.

Now on to the next thing 

INGREDIENTS YOU WILL NEED 


1 1/2 ounce Beeswax (I use Pellets typically but you can grate your own) 


2 Ounces Sweet Almond Oil 


Two Ounces Calendula Infused Olive oil


4 Ounces Olive oil 


1/4 Tsp Vitamin E  (DON'T USE CAPSULES.. that's not actually vitamin E usually. )


1/2 Tsp Tea Tree essential  oil


20 Drops Lavender essential oil


10 Drops Lemon Essential oil


Alright.. do you have everything Gathered? good.  The next parts are SOOOO SOO EASY

Add your grated or pellet beeswax to your container.

Add your Sweet almond oil, your Calendula infused olive oil, and your Olive oil..

Stir..

Put in microwave.. Microwave in 30 second burst.. and stir very well in between (or alternatively place in a container in a double boiler.. or create a double boiler.. but really microwave is much easier)  For me it took 3 30 second burst.. wax melted quite well into the oil..

 bring it over to where all your stuff is..

wipe off the edge of your container..

stir and stir.. and stir some more till its still hot to touch but not burn your skin off hot.

Add your essential oils..

Stir some more.. (lots of stirring isn't there)

Open your containers.. and carefully pour to your desired level of fullness.

Let cool.. and VOALA  you have Antiseptic ointment.


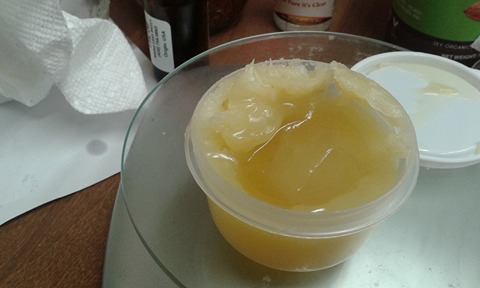
It will set up to a nice thick ointment that looks like this


Happy creating.. I created 2 years worth of ointment in about 10 minutes total.. that includes gathering equipment, mixing, pouring, and cleaning

Thank you for joining me.. I will be posting a post about calendula ointment next!

Thursday, May 26, 2016

Garden Update!

Good morning from Texas! The picture is our view to the west this morning. Simply beautiful.

Today is the next to last day of school here, my kids are super excited! And we have many things in the works around here. We're hoping to get a propane tank soon, so we'll have a working stove again, which means canning will be easier and homemade baked goods, like bread! We're also hoping to get some building done this summer, building a shed, various livestock areas and maybe even a greenhouse (fingers crossed)!

Now on to the garden!

Our morning glories are going crazy and I never trellised them, however I like the way they look without it so not worried about it this year.

The marigolds planted by the front steps have a bloom that's almost ready to burst open. We have a lily about to bloom as well. The rest of our flowers are still doing their thing.

The green beans should be ready for harvest soon and probably the peas not long after that.

Several of our tomato plants have buds or are already blooming. I'm excited to see how many tomatoes we end up with this year and to find out which types do the best for us out of those we planted.

Our pepper plants give me some worry. Most of them just don't seem to be taking off. But it's still early so maybe, we'll just have to wait and see.

The squashes, cucumber, cantaloupe and watermelon are growing away still. And my stick garden seems to show more signs of life each day.

As I said, we're still early in the season. I'll keep you updated as things progress into harvesting!

Tuesday, May 24, 2016

OMG You're a Prepper?!?!?!


Hello Lovelies, so been dealing with some stuff, and yes.. I am a prepper.. sort of.. I have a Homestead mindset, but since I don't have a home to stead.. I do what I can.. and that is prepping.

Do I think that there will be a Huge Zombie Apocalypse.. Nope.. already here.. hello look around.. zombies.. instead of brains they seek out WIFI.

Do I think that the End of the world is coming.. Nope.. Maybe the end of the world as we know it.. but not the end of the world.. the Planet can survive JUST fine without us screwing stuff up.


WHY THEN DO YOU PREP?!?!

Well I was raised in the south.. where there are a LOT of tornados, and Hurricanes, and really really nasty storms that would knock out electricity for sometimes days.

I believe in being prepared. I have been through a lot of stuff in my life and I can not comfortably sit there and go .. oooh everything will be fine. I will be fine.. because I dont know if I will. But I know if I do stuff to be prepared I can do my best to be prepared, for whatever may come.. will I survive a Nuclear attack? No.. probably not.. probably wouldn't survive if Yellowstone blew up either, but we CAN be okay if a Storm knocks out the power, if my Husband who is the ONLY source of income for our family loses his job, or gets kicked out of the military, We have money in savings, and I am working on having enough food and water set aside to last us and maybe 2-3 other people for 3-6 months.. that will take time.. and energy.. especially since I currently DO NOT have a canner, and we are surviving on one person's income since I am disabled.

Do you expect any of these things to happen? well No one expects the unexpected.. Why do you buy car or house insurance? because you hope you WON'T need it, but you have something there incase you DO need it, and that is why I prep.

What are the benefits of prepping?

well one .. duh.. being prepared..  we have ONE insured car.. so ONE drivable vehical.. .. what happens if we cant go to the store for a while? well not a big deal.. my Husband can get a ride to work, and I can work from our pantry stores.

If a Storm knocks out our power for a few days, well I have enough stuff on hand to make sure that we survive, and have light (because I make candles) and that my fish will survive.. because .. well my fish are my babies.. I will do a post on that at some point.. but today is not that day..

You prep to be prepared, I keep survival equipment such as, Life straws, Paracord, fishing equipment, guns, ammo, Emergency saws, emergency candles, etc etc ec.. so that Okay say we are on the road and something happens.. say SHTF and we don't have what we need to survive otherwise.. well then we have backups..

I also have stuff for trading and barter since I make soaps and such. MUCH more than I could ever need, but you know what.. people like being clean.

So yeah.. I am a Prepper.. not a crazy OMFG THE END OF THE WORLD IS COMING Prepper.. but a Prepper none the less..

and yes.. it does drive my husband crazy.

Sunday, May 22, 2016

Just a day (Taz)

Today we went to our local Bulk place Winco, and my husband was in total shock that I didnt fill the cart up and he looked at me like I was insane, but the fact was, there were a LOT of things I would have picked up, but I need certain things, so what I am able to bulk up on and stuff, is rather limited right now.. What I wanted to do is to look up prices, because you save money Buying in Bulk, and being able to Can and Dehydrate etc.. but right now while I can dehydrate, I dont have much storage room, so I am working on cleaning out the room for that and for my birthday I am asking for a pressure Canner so that I can can food, and buy in bulk.. but Pricing is a good idea cause I found Cheddar MUCH cheaper than our usual store, so I got some.. and I got other things much cheaper, but some things were WAY more expensive than we can get at our local Kroger/Smiths or at our Commissary.. so I know not to stock up there..  The weekend after next there is a Case sale at our Commissary and they have great prices so I will be stocking up on cans.. I cant stock up on too much fresh things because our entire family is about to go on our normal summer vacation to visit family and friends in another state.. so Know when to shop when not to shop..

Anyway.. yeah YAY my husband took me to my Winco, and he even apologized when I didn't make him go broke and I think I got something through his head today..

I stock up and prep, not because I HOPE I will need stuff, but because I might.. and I would rather have the stuff we need IF we need it.. than need it and not have it.. its kind of like insurance.. you might not need it, and you hope you wont need it.. but you want to have the stuff just incase


anyway Lovelies I hope you have a wonderful day.

Thursday, May 19, 2016

My Peach Mango Salsa Recipe

Hello My lovelies, I hope you are all doing well today,  Since I just got done making Peach Mango Salsa for my husband I thought I would share the recipe.


Now My recipe made 4 cups give or take.. and this is what I used, so be sure to take it and make it your own. 


What you will need : 

1/2  Red onion 
1 Lime 
Fresh Cilantro or Cilantro paste 
1 Fresh mango 
1 14 Ounce Can of Peach slices 
1 Large Jalapeno (you can use more if you like it spicy.. we really dont) 
1 Tsp Kosher salt 
4 medium to large Tomatoes 
1 Bell Pepper (I used Yellow) 

you can use your food processor or a knife, I used my Ninja Food processor for the Mango, and a combo of my Mandoline, and my Vidalia Chop Wizard for the rest of it. 

I chopped up my entire mango, and Gave it a few taps with my Food processor and plopped it in the bowl,
I then added my onion chopped with my Vidalia on the fine setting (which is what I used for the entire thing) 
Sliced my Bell pepper with my Mandoline and then chopped that up with my Vidalia
I sliced my Tomatoes with my Mandoline and chopped that up with my Vidalia 
I cut my Jalapeno in to 4ths after deseeding it and chopped with.. you guessed it my Vidalia 
finally I added my peaches then moved on to the seasonings so to speak 

I added 2 Tbsp of Cilantro paste, 1 tsp of Kosher salt and the entire Limes worth of Juice.. Mixed it up and there you go.. it took me about 20 minutes total but totally worth it. it taste delicious, and that is coming from me who does NOT like fruit in my Salsa other than the Tomatoes. 

so easy peasy I hope you make it and let me know what you think.. any questions please feel free to ask. 


***** Edit****

This recipe is very strong of Onion, and to get it right for my VERY picky husband we did test..

He did not like it chunky, he thought it was too oniony, and he didn't Know.. SOOO I added 2 more cans of peaches, a bit of the Juice, half a Clove of Garlic, two tablespoons of sugar, a Tablespoon of Honey and some Stewed Tomatoes.. Blended that to a finer consistency and he is a Happy camper..

SO If you like a more salsa type salsa.. Go with the first one.. if you want a very sweet slightly savory salsa.. go with HIS version.. I don't eat salsa since I have GERD, so this got made for him.. I hope you  figure out what works best for you.. Just Go with what makes you happy, get dirty, and experiment.

Info on finding great things at great prices

First of all please do not think I am insulting your intelligence, That is so SO not the point of this, however some people often overlook things, or don't think of things.

I was looking at my local Buy and sell KSL, and I wanted to cry quite honestly.. someone was giving away FOR FREE 7 Chicks. Her son had won them for something to do with Ag class, but they did not have the set up for them.  So.. some lucky person got 7 free chicks! 

I Have been looking at Equipment and stuff to get into raising, and breeding Chickens, Rabbits and goats, and Honestly.. that stuff is QUITE expensive.. So I have been looking at second hand stuff, which at this point is Pointless for me except to annoy the snot out of my husband, who thinks we have enough crap so I am not allowed to stock up on stuff like that..

But if you are in a Situation where you are saving up for land, or a house of your own, where you can keep Rabbits or a few chickens, or if you already LIVE in a place like that.. CHECK YOUR BUY AND SELLS! DAILY! you will not be sorry.. yes some days they have squat, but some days they have amazing deals.. one of the things I wish I had a place for was 185 Gallon Water storage tank for 85 dollars!  That is an amazing deal, 50 gallon food grade Barrels 2 of them for 50 dollars, which is totally doable,  Someone was selling a chicken coop for 50 bucks, and there are days where you will find something that might need a bit of work.. okay.. so do the work if it is an easy fix.. I have also found that people are often willing to make a deal, or even trade.. which is awesome. 

Buying Second Hand can save you THOUSANDS of dollars on equipment, some people just want to get rid of stuff they no longer use because they upgraded or downgraded.. and they are willing to make a deal just to get rid of it..

If you want FREE 5 gallon Buckets, TALK TO YOUR LOCAL RESTAURANTS.  Most of them use Food grade 5 gallon buckets and will give them away to you because its cheaper than the price they pay to recycle them. 

If you want to make Biofuel, talk to those same places to see if you can have their dirty oil, again.. its easier and cheaper for them to give it to you than it is to recycle it or dispose of it! 

BUY in bulk! whenever you see a REALLY great deal.. buy in bulk, you can Can, dehydrate, or freeze A LOT of stuff. 


So yes.. some of this is probably stuff you already knew, but some stuff people don't think about.
I hope this has helped you and I hope you have a great day! 


Wednesday, May 18, 2016

Garden Challenge

I was just looking through the new vlog posts of those I subscribe to and was inspired! So I thought I would pass on this vloggers way of thinking and challenge you to get started (if you haven't already).

When trying to decide what to grow, don't just buy random seeds/plants. Why? Because you might possibly plant things you don't currently use or end up with a bit of this and that, not having enough of any one thing to use effectively for your family. This could lead to waste and frustration.

So, what do you plant? Here comes the genius that inspired me!

Pick at least one thing that you are constantly buying when you go grocery shopping. It doesn't matter what it is, it could be broccoli, tomato sauce, peanut butter, pickles, a particular herb/spice, etc. Now make a plan to grow the ingredients that you would need to feed your family that item over the next year (or season if you really want to baby step).

What if you don't grow enough? Not a big deal. Plant what you think you'll need and if it's not enough, double or triple what you plant next year!

The only things you need to think about when choosing the item you are going to make at home are..

Will it grow in my zone?

Can the harvest be stored? (dehydration, canning, freezing, root Veggie storage, etc).

I love this way of thinking and over time it would get you to a more self reliant place with less stress and that is the goal! So I challenge you, if you're not growing yet, try this and produce a healthier product for your family and stop paying to much for it at the store!

Tuesday, May 17, 2016

Homemade simple yeast bread a How to blog

OM NOM NOM.. I love Home baked bread.. nothing in the world like it, and since I made homemade lasagna today, decided to bake some fresh bread to go with it.

I decided to show you guys step by step via pictures and words what I did.. and stuff.. but first you need the ingredients!!!!

5 Cups Flour *I used Bread but AP works fine as well. *
1 package of yeast or 1 Tbsp. *I used Quick rise but any will do*
2 Cups WARM water. NOT HOT.. Warm
1 Tsp Sugar
1 Tsp Salt * I used my own hand ground pink himalayan.
2 Tbsp oil of your choice *I used safflower
Cornmeal * Optional but I never make bread without it.
and also Optional is a Flour sack Tea Towel.


Alright.. got everything Gathered? yeah you do! awesome.. Okay Add the sugar to your warm water and stir it in until it completely dissolves.. Now add your Yeast and stir it in, when it is done it should look like this


see the light froth on top.. after about 10 minutes that froth will turn thicker like this


This is how your yeast showed you PROOF that it is alive, hence the name Proofing..  Okay at this point you will add your salt to the water along with 1 cup of flour and mix it up, it will look like this.  

Okay for the next step I wisely in my opinion abandoned the whisk, because you will be adding 1 Tbsp of your Oil, and 2 more cups of flour. Mix well until it forms a solid sticky dough.


Alright.. has your sticky dough formed? Now for the part where it gets Messy but fun.. Lay out your tea towel on a table.. or if you want a big mess to clean up just apply straight to your table.. two cups of flour, and Dump your sticky bread dough right in the center of it.. I will also show why I use a tea towel in the next couple of steps. 


Now to fold the dough over and knead it without getting your hands super sticky and gross. 


ignore the bruise on my hand and wrist, that was from a failed attempt at an IV at the doctor's office. 


 Basically you Roll half your dough over on to itself with the towel and push down, then you open it up and do it from a different direction.. do that until the bread is no longer sticky and then to it with your hands kneading and punching down the dough. 

 If it gets sticky just repeat the folding steps, DO NOT over Knead your dough.. that mans more than 10 minutes, it should spring back lightly when you push in to it, and then its good, form your dough in to a ball and then add 1 tbsp to the bowl you had your dough in before, and that if you were smart you scraped out REALLY well.


I added a bit too much but no worries there.  now add your dough in to the oil and make sure that it is COMPLETELY Coated in oil, empty the powder remnants of your tea towel and the flour that didn't get incorporated in to the trash, and then if you do like me, take it outside and snap it a few times.. just to get the majority of the flour off..  Take said tea towel, and Cover the bowel.. I would suggest moistening the towel first.. JUST BARELY DAMP not soaking, I didnt with the first rise and I regretted it.


so thats the bread dough all nice and covered in oil, then covered with the tea towel. 

Let this rise.. for at least I would say an Hour

after it has lay the tea towel back down and sprinkle lightly with flour just so your newly risen bread dough does not stick.  Now Dump your dough ON to said tea towel and smack it down


I did a bit more light kneading and then repeated the last step,  
I then Cut the dough ball into two halves and put it in my Long loaf pan, That I had sprayed with olive oil and sprinkled my Corn meal lightly on the bottom of, though you can put it in two loaf pans, Smack it down, smash it in to the pan basically, though hopefully you do a prettier job that I did, and then cover it again to rise IN the pan. 


let it get NICE and tall.. before you bake.. 


BAKE TIME.. you want to set your stove for 350, and LET IT HEAT UP! that part is kind of important.. for the rise in the pan as you can see I set the bread on top of my stove and let the heat of the oven pre-heating help it rise..
Pop your pan in to the middle of your oven or pans if you used two.. and cook for 30 - 35 minutes until your bread is golden brown and sounds hollow when you tap on it.


Notice its on a tea towel? Its also on a cooling rack, I wrap my fresh baked still hot bread in a clean fresh tea towel after taking it out of the pan to cool, so that the moisture in the bread actually softens the crust.

Let the Bread cool off for at least 20-30 minutes, slice and enjoy!

I hope that this was easy to read and understand, if you have any questions please ask in the comments, and if you make it yourself please share pictures I would love to see what you make!


Basic Soap Recipe 3


Above is some Sandalwood soap I made using this recipe, if you are wondering what the dark spots in the middle are.. This recipe partially Gelled, and that is what causes the Dark spot in the middle. 


Hello Lovelies, It's Taz here with another Soap Recipe for you.  I will Again remind people that this is NOT a How to Blog post, it is simply the Recipe I use to make my soaps. Look on my Blog post for Vinolia soap, or Favorite Youtubers, posts for Where to go to learn about soap making and never attempt to make soap without proper Precautions and knowing at least the basics of soap making, and ALWAYS run any recipe through Soapcalc to make sure that you have it right. . With that said, let's get on this.


Ingredients you will need :

Lye
Purified or well filtered water

*Tussah Silk if you choose to use
* Sea Salt/ Pink Himalayan Sea salt  if you choose to use
* 1 Tsp of sugar if you choose to use


Coconut oil 92 degree
Cocoa Butter
Castor Oil
Rice Bran Oil, Refined
Olive oil

Fragrance or Essential oil of your choosing if you choose to use it.

If you would like to make a size other than a 2 pound recipe such as mine is the percentages are as follows


Water as a percent of Oil weight is 38%
Super fat 5%
Lyce Concentration 25.864%
Water : Lye Ratio 2.7225 :1

Coconut Oil 92 Degree - 25%
Cocoa Butter  - 12.5%
Castor Oil 6.25%
Rice Bran Oil Refined - 18.75%
Olive Oil - 37.5%


For my 2 Pound loaf Recipe this is the Amount of Lye, water, and oils That I used. Please Note that in EVERY Soap Recipe I add 1 TBSP of Pink Himalayan Sea salt and a cotton ball sized pinch of Tussah silk to the Lye water. To counteract the softness of this recipe, and increase the Bubbliness I added 1 TSP of regular sugar to the Lye water as well.


Water - 12.16 Ounces
Lye 4.47


Coconut oil, 92 degree - 8 ounces
Cocoa Butter - 4 ounces
Castor Oil - 2 ounces
Rice bran oil, refined - 6 ounces
Olive Oil - 12 ounces

1 ounce Fragrance oil or Essential oil

The Soap Qualities for this bar are

Hardness - 39
Cleansing - 17
Conditioning - 58
Bubbly - 23
Iodine before salt to lye water - 61
INS - 146


And, there you have it folks. I will do some of my more detailed Soap recipes soon, but I figured I would start with my Basics and work my way up from there!


Sunday, May 15, 2016

Triumphs & Setbacks

I've been wanting to make another post, I just am not sure what everyone wants to hear about and I haven't had much time the last week to think about much. My oldest's prom was last weekend, this weekend she had Miss Rising Star and sadly she did not win, but that's okay, she was still the awesomest! Being the end of the school year, it's been busy with kid stuff. If anyone has any specific questions or wants to see certain content, let me know! As for today's post, triumphs and Setbacks, you're going to experience both in gardening (or homesteading in general for that matter), it's just a fact of life, so i wanted to share some of my most recent.

The picture that you see is one of those Setbacks. Our cats (I'm guessing), decided to be cute and knock over all the planters on my rack. I wasn't to thrilled at all. But I managed to save most of the plants. We will have to replant our backup carrots and might have lost some lettuce and spinach plants. I discovered the destruction yesterday morning and this morning found another one knocked over. So today if I have the chance (our oldest 3 are getting ready to leave for a band field trip), I'm going to see if I can't find a way to keep the planters in place!

I discovered today that most of the compost pile we started just a couple of months ago has broken down already! It seems a silly thing to get excited over, however it's the first time we've tried doing our own compost and I honestly didn't feel like I knew what I was doing. So now that I've seen it's working, I might start a bigger pile!

This morning I discovered that our red potatoes are sprouting, so yay! And our stick garden is springing to life!

So far we've had more success than problems (knocks on wood), though I have a few problems to solve.